Saturday, June 30, 2007

in which we attempt to clear drains

Attempts:
  1. N's 25' auger - eventually worked its way into the drain, clearing some blockages. Intermittently added boiling water to see if it could dissolve some of the built up soap goo. Auger reached its limit with only slight improvement in flow. Not enough to take outflow from washing machine.
  2. Power auger rented from Home Depot - would not even go around the bend, was not flexible enough.
  3. 50' auger (bought from Home Depot) - eventually went 15' into the drain. Still no noticeable improvement.
  4. Haul washing machine into kitchen, put pipe into sink, turn on long enough for it to drain, watch with concern as the sink fills up to the two thirds point before draining.
  5. Hand three weeks worth of laundry to A, who volunteered to use their machine to wash it to spare me the three hours in the laundrette.
  6. Purchase bacterial drain gunk eater to see if that'll work (without filling the house with noxious fumes from chemical drain clearer). Wait until morning to see if it's had any effect.
  7. If that didn't help, hire plumber when we can afford it, (some time in August at the current expense rate), and hope that the (probably cast iron) pipe (which runs under the concrete slab foundation and is therefor inaccessible without cutting through said concrete) is not broken or corroded through.
Actual achievements for the day:

  1. Sorted through three rubbish bins in the garage to make one and half bins of actual trash, and a pile of tools and other miscellaneous things that are actually usable, and a pile of kindling. Left tools and other things from the garage by curbside for people to take. (Half of the pile is already gone).
  2. Filled four 30 gallon bin liners with rubbish from the attic. Placed a few of the not-trash items by the curb with the rest of the pile. Things found in this process: the other boot (the first one was found several weeks ago), an inflatable pink Easter egg, enough Christmas lights to go around the entire house (if any of them actually worked), broken tree decorations, the tree, a box of fake pumpkins, a truck bed liner...
  3. S scraped paint of part of the dining room wall, and cleaned the back room somewhat.
  4. Mowed the rear meadow. (It's not a lawn, or a garden, it's a patch of greenery, some of it actually grass (there's at least five different varieties on this property) with up to a foot of height variance, and not, of course, a nice slope there.
There's now actually a path from the ladder to the attic window that can be traversed without risking life and limb. This enables the window to actually be closed (the POs left it open) in the event of, say, rain, thus preventing further water ingress.

Stupid People Tricks

Don't do this:
  • Get stung by wasp that's crawled into cleaning rags because you left the back door open in order to air out sewer odor eminating from laundry drain. (M)
  • Spill globs of spackling on sheets and pillowcase while patching gash in bedroom ceiling while you do not have a working washing machine and all your extra sheets are being used as floors. (Me)
  • Wait a week before emptying a wet/dry shop-vac that you have used to suck up soap-dirt-water-pure filth from floors. For future reference, doing this is probably the easiest way to get eau de pig farm without the pigs. And yes, I know what pig farms smell like, having spent two summers of my youth on one. I quite like pigs. I quite dislike the smell of pig lagoons wafting through warm, foggy morning air. (Me)
Belongings of POs currently sitting at curb:
  • Training toilet
  • Red beanbag chair
  • Cat litter (they got rid of their cat a year previous to selling the house, according to the neighbor - the tub of unused cat litter is, at least, less disturbing than the litterbox full of dirty litter and poo that they also left behind)
  • Box o'knives (I doubt the wisdom of leaving this at the curb, myself)
  • Charcoal (we put the grill out previously and it was taken within an hour)
  • Treadmill, minus control panel (that went in the dumpster long ago) Taken!
  • Cat carrier Taken!

Slow going

Slow and sporadic... that's me this week. Other than Water! Water Everywhere!, it's been pretty dull around here. My mother came out in the beginning of the week (actually, I took the train out there and then drove us back - my first time doing long-distance, 75mph driving) to help. It was hot enough, though, that neither of us did much of anything while she was here. The air conditioner doesn't cool much of anything other than the living room which is currently too full of boxes and other stuff to work on.

We did strip some paint in the dining room, which led to the discovery that there's a 4x4 foot area where the plaster's been replaced entirely by drywall. It makes one wonder just what happened to the wall that the POs needed to replace that large a section of it.

I've been cleaning the baseboard heater (pipe and fins only - the surrounds have been taken out entirely due to the stench) in M's room. A number of fins had to be cut through and removed because they'd corroded to the point of not staying in place. This picture:

Heater

is not of that section. It is of the cleaner part of the heater. Ah, the scent of urine and corroded metal! mm.

I also primed some of the trim in my room, touched up the bits of ceiling I'd managed to paint purple while painting my walls, and stripped more paint from the trim in the wallway with the heat gun. It might have been the fact that I'd taken my muscle relaxer an hour previously, but I found there to be something strangely (and worryingly) somnorific about using the heat gun.

I've been frustrated about not being able to work on the houseblog (due to laptop death), almost as though getting it in the state I want somehow contributes to the state of the house itself. ...The saddest part in all this is that I do not have a single picture of the house that isn't so crummy that I'm unwilling to use it in a banner. The air conditioner in the front window just adds to the sad, gloomy look of things. (Actually I had a post in progress about the mood/air of the house due to its reject style roof, but, naturally, it was ON MY LAPTOP.) Ah, well...

Friday, June 29, 2007

in which we attempt to install a washing machine

The POs took their washing machine with them. A friend (N) gave us their old one as they were upgrading. Sounds great, until we enter the twilight zone that is this house.

Day 1 (Tuesday)


The washing machine is delivered by N.

The pipe from the previous machine was still attached to the drain hole - they'd just hacked it off part way down. The pipe removed easily enough, and the waste pipe for the machine fit into the rubber connector. All seemed well.

That is until we tried to actually use the machine. At which point the water just drained right out the bottom and down the drain hole rather than filling the machine. Not helpful, and inexplicable. Until you learn that the machines require the pipe to travel up above the top otherwise they do just this, and it's only recently that a few manufacturers have come out with machines that don't have this fundamental design flaw!

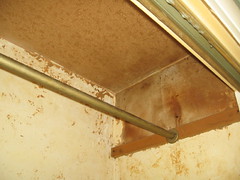
So I investigated what this was supposed to look like. Everything I could find said that there should be a 2" wide stand pipe (there wasn't), with a p-trap (basically a ubend) in it, and that it needed to be open ended (not sealed to the drain hole). Fixing this seems simple enough. I should know better by now.

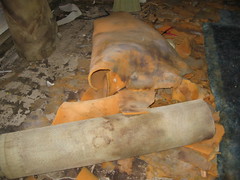
The rubber connector was 1" wide, and connected to a 1.5" adapter to a 2" drain hole. The rubber connector removed easily enough, but left a bent metal connector on the 1.5" to 2" metal adapter, which was screwed into the actual drain hole.

Day 2 (Wednesday)

First trip to Home Depot provided pipe (helpfully pre-cut to the lengths I needed), along with a replacement seal for the bathroom toilet tank (a separate issue - that tank was running continuously).

This connector was, of course, a non-standard octagonal contraption that was thoroughly stuck and too large for any tools I had, something I'd neglected to check the night before.

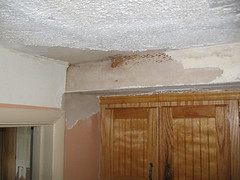
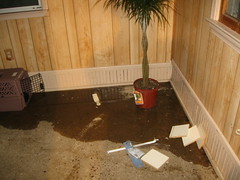
The evening also gifted us with a thunderstorm, leaking back windows in the rear bedroom, a small lake in the "family room" (that's a whole other DIY disaster courtesy of the the POs), and a power outage to go with the 95F heat.

Our Swimming Pool

Day 3 (Thursday)

A second trip to Home Depot for tools did not solve this problem - the weird octagonal adapter did not quite fit in the "universal" plumbing tool (due to its octagonalness). A side trip to Lowe's for an energy efficient (or as much as there is) air conditioner (seeing as Home Depot doesn't stock such) was successful - both in acquiring said air conditioner and a sudden downpour dropping the temperature by 20F and making it less urgently needed.

Day 4 (Friday)

N to the rescue with tools that might defeat the octagonal monster. They do indeed fit, but the monster refuses to move in the slightest, even when doused with WD-40. The application of one of the pipe pieces to the tool handle provided enough leverage (simple tools win again), and the monster gradually yielded.

The pipes all fit snugly together (even without any form of glue they appeared to be water tight, and very hard to take apart again). So I connected them to the drain hole, connected up the washer and turned it on. All seemed to go well, at least until the machine started to empty out. Which is the point we discovered that the drain itself does not empty. Or at least not anywhere close to the speed required.

Day 5 (Saturday)

In which we attempt to clear drains.
(This is a scarier process than might be obviously apparent - I found popcorn, among other things, in the dryer vent when I cleaned the laundry room... -S.)

Sunday, June 24, 2007

not so stubborn paint

Having exhausted the hi-tech options, we tried the low-tech ones...

It turns out that simply spraying the recalcitrant paint with plain water (not the water & vinegar mix that was left in the spray bottle - that reacts with the plaster), leaving it a minute then applying the scraper gets 90% of the paint off. Much of the rest is the "washable green" layer that wipes off with a damp cloth.

So the remaining part of the hallway took about four people-hours, as opposed to the 8-10 (with much dust) or 20 (with heat gun) it would have taken otherwise.

It still needs to be sanded I think, to level out the rough spots, and needs many little pock-mark holes filled in, but it could be painted once the holes are filled and look alright.

The main hallway looks like it could be done in a day using this method. :-)

Stubborn paint

Removing the residue of the paint on the plaster walls.

The walls are not flat (that's 50 year old plaster for you), so both scraping and sanding takes much longer than it would otherwise. The plaster absorbs the heat from the heat gun, which means the paint is much harder to remove than it is from wood.

With the heat gun, followed by washing the green residue off the wall.

This patch (below the line, which is about 5 feet up) took about four hours.

This was after fixing the toilets yesterday, and I learned some things that might make it go faster in future: the angle of the scraper makes a huge difference for example, and the heat gun gradually gets more effective the longer it's on - it doesn't reach its highest temperature for several minutes it seems.

A (small) section of this was done with a blowtorch rather than the heat gun. (See what happens when I'm away? Walls are SET AFIRE. - S.) This is somewhat faster - the heat is more focused and direct and the paint just blisters off, but it does leave faint scorch marks on the plaster itself.

This is the opposite wall of the hallway, after about 1:45 hours with a power sander.

The sanded wall is considerably smoother, with some of the unevenness of the wall reduced. It produces a lot of dust however, even with the dust catcher attachment.

The little bit above the line, on the left near the corner, that looks green was done with the heat gun and scraper, to do a compare, that's what it looks like before washing off the green.

Given the thickness of some of the remaining paint, a thicker primer is not going to help.

Adding a surface skim of plaster would solve both the residue, the unevenness and the remaining pockmarks.

Saturday, June 23, 2007

Toilets

Well, having replace the wax seals on both toilets (due to their leaking whenever flushed and adding to the odors of the house), I discovered they were not bolted down.

The flanges the bolts connect to are either (a) buried so that you can't get a new bolt in, or (b) broken off entirely!

So at some point we need to take the floors up and replace the flanges.

At least the eau-de-toilet is no longer adding to the ambiance.

Wednesday, June 20, 2007

Motivation...or lack thereof

Here's a small section of wall in the entry way showing the stubborn remains of old paint that didn't come off with the latex layers. This section is mostly tan. There appear to be two layers - the tan layer (top) and a green layer (bottom). The green layer seems to be water soluble. When M was washing the walls, the sponge and wash water turned green...but there are still green bits on the walls, so it didn't all wash off.

Old Paint

This is what the walls in both hallways, the kitchen, the living room and the dining room (probably - we haven't stripped the latex paint off in there...YET) look like.

It's beginning to make sense why the POs put such an incredibly thick coating of paint over this and why some of it was 'artistically' (I use that word in the most generous way possible) mottled and textured. Because this old stuff? Does not come off unless you have superhuman patience, tenacity, and SKILLZ.

So we bought a heat gun (the cheapest one, erm), which is fantastic...on the trim. Not so the walls. I estimate the project to take months, if not years, using the heat gun (I can't tell if this is an exaggeration born of despair or not - it is truly that slow).

Other options are: chemicals, that heat thing that costs $400+ (given the large area that needs stripped, the latter might actually be cheaper), or slave labor.

...I opt for trying a thicker primer before exploring any of the above. (Ah, yes, contributing to the mess are the two layers of thin, low-VOC primer that I already put on one wall in the long hallway, which served no purpose except to prove that thin, low-VOC primer does no good in most of our house.)

Friday, June 15, 2007

We moved Storm and the rest of the stuff from the apartment in last night. Mostly plants, cat accoutrements, and cleaning items.

She seems to be adjusting well -- exploring all the rooms, jumping in the windows, and being frustrated about the high window in the bedroom that she can't reach (the sill is too small for her, anyway).

Storm

The screens in the living room windows are not cat proof... I tested them by pushing on them and one of them fell right out of the window into the rosebush. They're some sort of new fiberglass and plastic screens that don't have proper locks. While I hate wrestling with old metal screens, they, at least, do not fall out of windows with a little nudge. ...You know, there aren't even any storm windows on these things, so maybe you're not meant to wrestle with the screens to begin with. I bet the rain doesn't sound the same on them.

We still have to move Spook and my furniture from E-town...eventually.

Next on the task list is getting both my room and M's room (we have three bedrooms - we've each claimed one of the extras as 'personal space') done (to the extent that they can be 'done' with no floors) so that we can move stuff into those rooms in order to complete the living room and master bedroom.

My room only needs a few things. I need to finish scrubbing the old wallpaper glue out of the closet so I can prime and paint it, fix the holes M and I made in the drywall (one of the few odd spots of it) when trying to get a wood shelf-ish thing off the closet wall (of course, this involves actually getting the wood things off the walls), and painting the trim. I don't think I'll worry about the trim for now. Spook's going to stay in there for a bit, so I need to get the screen repaired in one window and obtain a screen for the other (if possible). I also need a new cat tree so that she can actually reach the windows. She will climb the wall, or attempt to, if she can't get to them.

M's room needs more work. The windows in there are moldier, the concrete still has carpet glue all over it, the walls still have a few bits of paint to be scraped and there are a lot of holes to fill. There's also the issue of the corroded heat pipe (baseboard hot water heat)...

This weekend is the toilet project. Yay.

Thursday, June 14, 2007

Yay!

Some good news - the ladybugs came back! A few weeks ago we discovered that the cherry tree had aphids on it...LOTS of aphids. (I thought the leaves were just turning black for no reason, but someone else noticed that the black leaves were covered in tiny black bugs.)

So I ordered 1500 ladybugs from Gardener's Supply. They arrived via UPS in a little box with holes poked in it. The ladybugs come in a mesh bag filled with moist wood shavings. They become active as soon as you take the bag out and unfold it.

One website advises you to refrigerate the ladybugs until it's time to put them outside (at dusk), so that they're slower and don't fly away immediately. According to Gardener's Supply, you can refrigerate them for a couple of days, making sure to give them a 'moist raisin' to eat.

At any rate, we refrigerated them, box and all, in the produce section of the fridge until dusk. We put them all over the lower part of the tree and the most affected leaves, and they seemed happy enough... But they were gone the next day! I regretted not having gotten the mesh sheets that Gardener's Supply suggested to keep them in place.

However, M informed me in beginning of this week that they were back. There aren't 1500 of them, but there are a fair number of them back and feasting. I can even see a few from the family room window. Even better - we have ladybug larvae now, too! They're bizarre enough looking that I'm glad Gardener's Supply sent an info sheet on what eggs and larvae look like. Apparently the larvae consume even more aphids than do the adults.

Unrelatedly, this rug would be awesome for the hallway.
I didn't get a whole lot done yesterday. I cleaned the baseboard heater in the dining room, in an attempt to eliminate the remaining scent of dog. This was unsuccessful, but it did reveal that the color of the pipe is silver, not black.

I started painting the shelf in the family room, but didn't complete it because a spider had built a web on the bottom of it.

I also began painting the door in the family room, but then realized that the old paint just strips right off... So it turned into a paint stripping project instead.

I found this incredibly useful looking tutorial yesterday when I was looking up why a toilet would leak from the base (which both of ours are doing, naturally).
Replacing A Toilet Wax Bowl Ring

Wednesday, June 13, 2007

Paint! (again)

What I was basically told when M bought this house was:

  • Carpets are dirty and need to be torn up

  • Needs new paint

  • Yard not in great shape


Now, the carpet step has been completed. It was probably the most disgusting thing I've ever done (pictorial evidence available at my Flickr page). We're down to concrete (with some remaining mastic stuck to it). Fine, okay, it still smells but it can be dealt with.

But I'd expected to paint weeks ago. We've done tons of prep - wallpaper stripping, paint stripping, sanding, patching, cleaning... But only a single room reached the point of paint -- my room which is, after a layer of primer and two layers of paint, now a pale lilac.

The master bedroom has been primed twice and is ready for paint...but we were forced to move in before the house was ready, so now it's filled with furniture. At some point, when I'm capable of lifting anything (I hurt my back painting the ceiling in my room!), I'll move the furniture and paint.

The hallways, foyer, and living room were thought to be ready for painting, but the hallway has proved that this was a wishful, unrealistic thought. The layers of paint we stripped were latex. Underneath that is a more stubborn, flaky-not-peely paint. I don't know if it's an old oil-based paint, or if it's some kind of plaster specific coat. We thought it was sanded to the point that we could paint over it, but the unevenness is very, very obvious even through two coats of primer.

Apparently it's common practice in England to put up something called lining paper when painting over plaster that's previously been painted or wallpapered, but I haven't seen anything of the kind here. It would make a smooth surface, I suppose, but the idea seems kind of counterintuitive to me.

The other option is to get some kind of chemical paint stripper (I'm looking at Peel Away Smart Strip as a relatively non-toxic option) but the price, given the area we'd need it for, is daunting. Not quite as daunting as stripping yet another layer of paint off all of those walls again, though...

Plaster! (again)

Yesterday's disheartening moment came during the project of removing the faux popcorn ceiling in the kitchen.

It did have to go -- the PO applied it badly. It looked like uneven cake icing, with great peaks and waves along all the edges in much greater quantity than that which graced the rest of the ceiling.

I know, I knew, that this spray-on popcorn is generally used to hide some greater flaw. I did not expect this 'flaw' to be a poorly repaired four foot hole in the ceiling and crumbling plaster walls above the stove.

The project was eased, for the most part, by the fact that rather than scraping all the icing off I was able instead to just peel the thick layer of paint underneath it off, the icing coming with it. But then I reached the Hole. My scraper met resistance. There was no paint underneath this section of icing. There was...drywall?

I gave up on that section for the time being, as I couldn't scrape the icing without scraping the drywall as well.

I started on the lower sections of ceiling, also popcorned, over the fridge, sink and stove. I ran into trouble when the top coat of the plaster began peeling off along with the paint. Over the stove, the top coat simply shattered and fell off at the touch. So there's a four to six foot section of upper wall/ceiling that either has no finish coating or has finish coating in imminent danger of falling off. The brown layer of plaster is worryingly crumbly/fragile to the touch, there are cracks in it, and there's a distinctive brown/rust stain that looks like the mesh layer inside the plaster. Water damage, yes? That would explain the repaired hole in the ceiling, too (although it would have to be a LOT of water).

So much for painting the kitchen anytime soon.

Broken Plaster

Apparently, plasterers are rare and expensive these days. I really dislike the 'hide it with drywall' idea. I want to have the plaster fixed, not hidden. I don't feel capable of doing this myself, though I'm sure that's the most cost effective way. I'm not sure how much of the brown coat would have to be knocked out to make the repair... Presumably the cabinet would have to be removed, too. augh. (And the tile above the stove? And the hood fan??)

Welcome to The Dread House

Prompted by the niftiness of those little progress bars in other home renovation blogs (!?) -- okay, by both that and the fact that 'home renovation blog' is, apparently, its own genre of blog -- I've started this one.

I hope writing about it will make the whole thing seem less hopeless, daunting, and disheartening.

Welcome to The Dread House.

What is The Dread House?
  • It is a 1950s brick ranch built on concrete slab with a decent attic (except for the STUFF - apparently the leavings of more than one PO - filling it) and no basement.

  • It has plaster walls on metal lath and, currently, no floor except for aforementioned concrete slab.

  • It has two additions added by the POs -- one of these is a 'family room', the exterior consisting of cheap siding and duct tape; the other is a...um...'foyer'. Right, a 'foyer'. Looking at the houses around us, it appears that it used to be a porch with a roof. It is now an enclosed room that forces us to go through a sliding glass door before we even reach our real front door.

  • It has not been maintained in years.

  • It is filthy and was apparently inhabited by incontinent dogs.

  • It has numerous other bizarre and inexplicable 'repairs' and DIY jobs left by the POs. These include: the aforementioned additions, a table/counter glued to the kitchen wall, mysterious wiring (where does it go? where is it from? what is it for!?), a copper pipe that only goes part of the way through the wall and exits into the front garden, a pile of lumber and windows in the yard, an extension cord that runs under the driveway, wallpaper everywhere, a shower installed patchily in what used to be just a bathtub (they didn't repair the holes in the closet wall they made to put this in), toilets that aren't bolted to the floors, etc, etc, etc.
(...Oh, and one of the other things the POs left behind? A dog they buried in the yard several weeks before closing! We're entirely unsure what to do about that.)

I've been working on the Dread House for about 4 1/2 weeks now. Most of the time it's been just me. Some of M's friends have contributed, too, one of them coming over every other day for a couple weeks.

This is what we've accomplished:
  • Removed all carpets, padding (modern and coconut fiber) and tackstrips. Scraped floors numerous times to remove remnants of padding. The carpet project was the worst - every room except for the utility room and bathrooms was carpeted. Yes, this includes the kitchen. While the utility room wasn't carpeted, it did have an area rug which was fused to the tile.

    The carpets were all FILTHY. The pads were moldy. This is presumed to be related to the incontinent dogs I mentioned earlier.
    Living Room Carpet Padding
    During this stage of demolition, I had to wear a respirator in order to avoid the stench. I went through a box of tissues a day because of my allergies. You could smell the foul odor from the driveway.

  • Removed baseboards and most baseboard heater covers. Again because of the stench.

  • Cleaned refrigerator. This was a bigger task than you might think. It was May. I found what I believe to be their Thanksgiving turkey in one of the fridge bins. (M insists it was an Easter turkey, but poultry does not turn quite that green after a single month.)

  • Stripped wallpaper in living room (all walls, floor to ceiling, complete with decorative border at top), two bathrooms, dining room (bottom half of walls), master bedroom (decorative border), kitchen (decorative border), and three bedroom closets (all walls and ceilings).
    !?

  • Stripped wall paint in living room, main hallway, one bedroom, and entry hall.
    Peeling Paint
    This was not a project we planned on, but then the paint started peeling around where we'd pulled molly bolts out of the walls (argh, grumble)...and kept going.

  • Tore up asbestos tiles (two layers!) in utility room. The tiles were damaged when we pulled up the area rug, which was fused to the floor due to what I believe to be a diabolical combination of dog and/or cat piss with the backing on the rug. I ripped up about a quarter of the room before realizing that the size of the tiles appeared to be about 9 inches square...which, combined with the age of the house, indicated asbestos tile. We sent some off to be tested and, sure enough, it was. The best part of this mess is that the black mastic in there does NOT contain asbestos.

    I finished the rest of the project in gawd-awful, sweltering PPE. (The asbestos abatement people wanted $1400 to do the job. Like, no. Now we just have to pay them to haul it away.) The room's now been scrubbed and mopped thoroughly. I don't think they ever cleaned in there. One of my odder discoveries was unpopped corn kernels in the dryer vent tube. What the...? Part of the wall in there is damaged (looks like drywall or something) and was falling apart when I was pulling out the baseboards.

  • Removed ghastly, murderous grass plant from front yard. I also removed a lot of poison ivy from the backyard, but it was the grass plant that actually caused me grief and injury. Before M trimmed it (it attacked him, too) it was taller than the house. It weighed more than I do, so after I finally dug deep enough around and under it and pushed it, bodily, from the hole, I was unable to haul it back to our yard pile

  • Rented a skip to dispose of as much of the POs' stuff as possible. They didn't finish packing and moving even though they were given three extra days past settlement to do so. So they left furniture, tools, trash, a dirty cat litter box, a TV in the yard, etc. We filled the skip to the top without even starting on the attic.

  • Cleaned the hell out of the concrete slab multiple times with various cleaners. Had someone fill the cracks (living room, master bedroom, kitchen, dining room, hallway). Discovered via cleaning that part (just part!) of the concrete in the 'foyer' is painted! It was so filthy before you couldn't tell.

  • Prepped, primed and finished painting one bedroom (except for trim). Prepped and primed master bedroom. Filled holes in other walls... so many holes... There are still more.

  • Stripped faux popcorn crap off kitchen ceiling. Unhappily, this was one of those 'and then you discover something ELSE wrong' projects.

  • Sprayed windows and doors with Orange Guard, a natural ant killer/repellent. Got ladybugs to take care of aphids.

  • Took out ancient, mouldering air conditioner, located storm window (in shed!), removed spider from said window, put window back where it belongs.

  • Had electric mess fixed (grounded sockets installed, wiring corrected, wire to nowhere in living room repaired...) by M's friend.

  • Put in new dining room light. The old one had a broken socket with live wire sticking out AND was so low you could walk into it